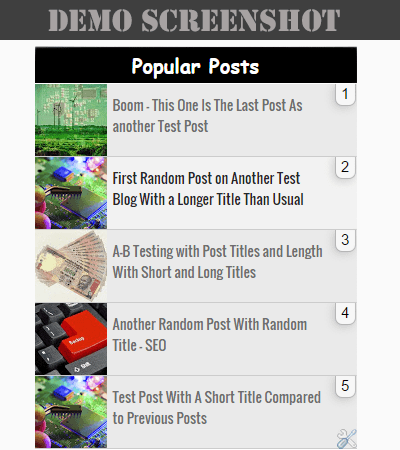
Some Features of New Elegant Style Popular Posts Widget
- Default Thumbnails used (no JavaScript).
- Cool Counter Box Hanging Left Side.
- Simple Neat and Clean Design.
- Easy Customization.
- Cool Hover Effect.
- The whole List item is clickable, that means it will be clickable when the mouse is hovered on the list item area and not only by hovering the mouse over the title link or thumbnail like as other widgets.
- Using Google fonts.
Note: You do NOT have Permission to share my code on your blog

You can also check the live demo by visiting here: - Live Demo. I hope you liked it and we should move on to installation.
Installing New Elegant Style Popular Posts Widget to Blogger
Ready to add? I have used Google font family Oswald (Lovely Font) which gives this widget an elegant look so I recommend you to use this font family. In case you're already using then you can skip this step of adding Google font family to your template.Add Popular Posts Widget to Your Template Sidebar First
First of all you need to install it from blogger gadgets library.
Go to Blogger - Layout - click on Add a Gadget link into sidebar then add a popular posts widget. In case you have installed it already then skip this step.
Change Configuration Settings
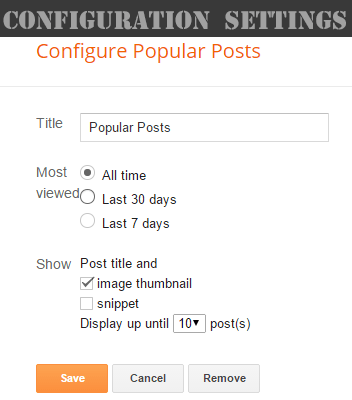
Now just change the configuration settings of newly added popular posts widget where you have to uncheck snippet. See the screenshot below.

Adding Google Font Family "Oswald" to Your Blogger Blog
1) Go to Blogger - Template - Edit HTML (Save a backup copy of your template code first)2) Find out this code
<head> and paste the Google font family link just below this code(Use Ctrl+F or Cmd+F after clicking inside the template code box to open up a search box for searching your code)
<link href='http://fonts.googleapis.com/css?family=Oswald|Open+Sans:300italic,400italic,600italic,400,300,600,700' rel='stylesheet' type='text/css'/>Adding CSS Code to Your Template
Now all you need to do is add the CSS code of popular posts widget into your template code.I have made it for using in the sidebar by adding
.sidebar class to it, but you can make it work in the footer too. Just change the .sidebar class with your footer id or class name.Note: If you are using any other popular posts widget already for sidebar then you need to remove that CSS code first otherwise it will not work and you will mess up everything.
If you need my help then leave your message in the comment section with your blog URL.
3) Find out this code
]]:</b:skin> and just before that paste the whole CSS code given below as it is./*----Sidebar Popular Posts Widget Style by www.TwistBlogg.com----*/
.widget .widget-item-control a img {
border: none;
width: 20px !important;
height: 20px !important;
padding: none;
background: none;
-moz-box-shadow: none;
-webkit-box-shadow: none;
-ie-box-shadow: none;
box-shadow: none;
}
.sidebar .PopularPosts .widget-content ul li {
padding: 0px 0px 0px;
height: 73px !important;
overflow: hidden !important;
list-style-type: none !important;
list-style: none;
}
.sidebar .popular-posts ul {
padding-left:0px !important;
list-style-type: none !important;
}
.sidebar .popular-posts ul {
counter-reset: popcount;
margin: 0; padding: 0;
}
/*---- Change Counter Box Style Here ----*/
.sidebar .popular-posts ul li:before {
background: rgba(247, 247, 247, 1);
color: #000000;
content: counter(popcount,decimal);
counter-increment: popcount;
float: right;
font-size: 15px;
line-height: 20px;
list-style-type: none;
padding: 0px 6px 1px 5px;
border-radius: 0px 0px 7px 7px;
position: relative;
display: inline-block;
box-shadow: -2px 2px 10px rgba(187, 187, 187, 0.7);
font-weight: normal;
top: 0px;
right: 1px;
z-index: 999999999999;
border: solid #B5B5B5;
border-width: 0px 1px 1px 1px;
}
.sidebar .PopularPosts .item-thumbnail {
float: left;
margin: 0px!important;
}
.sidebar .PopularPosts img {
padding-right: 0px !important;
width: 72px;
height: 72px;
overflow: hidden !important;
margin-right: 0px;
}
.sidebar .PopularPosts .item-title a:hover {
background: #f6f6f6;
color: #000;
}
/*-----Change Font Family -Background - Style - Size or Color Here-----*/
.sidebar .PopularPosts .item-title a {
background: #EAEAEA;
color: #6E6E6E;
display: block;
font-size: 14px;
font-weight: normal;
line-height: normal;
font-family: "Oswald",sans-serif;
padding: 10px 30px 0px 78px;
transition: all .4s ease-in-out;
height: 62px;
text-decoration: none;
border-bottom: 1px solid #cccccc;
}Save your template code now and you're done. Visit your blog to see your new popular posts widget hanging into the sidebar.
If you're not able to get it working then leave your message in the comment box with your blog URL and the problem you're currently facing. Even if you want some changes then you can ask me.
Editing: You can edit this widget the way you want like as changing the font family, font size, background color, hover color or color of the counter box. There is no complicated coding and I have highlighted the comments where you can change the code easily.
Did you like this widget? Do you prefer to use it? Do you want any changes? Your opinions are always welcome. Thanks for reading, Stay Blessed!
