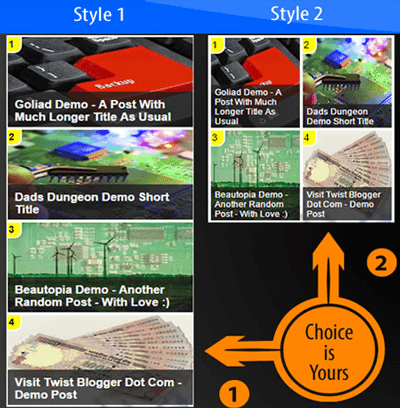
There are a lot of widgets out there shared by people all over the internet and therefore I am sharing mine to which I am using on this blog. However, I am offering this stylish popular posts widget with counter box and thumbnails feature in two different styles and choice is yours :)
✔ Beautiful image zooming effect on mouse hover.
✔ Post titles are shown on the images with transparent dark color.
✔ Beautiful Counter Box on top left side of the images.
✔ No Blurry Images, you can re-size the thumbnails without losing the quality as compared to default blogger post thumbnails which are generated in 72x72 pixels in size.
✔ Available in two different styles.
✔ Easy customization of colors, width, height.
✔ And its free :) See the screenshot of two different styles below.
Now save your template code and see if your popular posts widget with thumbnails is working or not. It must be working.
Recommended: Floating Social Media Share Buttons For Blogger

Features of Stylish Popular Posts Widget With Counter Box For Blogger:
✔ It shows post thumbnails along with post titles.✔ Beautiful image zooming effect on mouse hover.
✔ Post titles are shown on the images with transparent dark color.
✔ Beautiful Counter Box on top left side of the images.
✔ No Blurry Images, you can re-size the thumbnails without losing the quality as compared to default blogger post thumbnails which are generated in 72x72 pixels in size.
✔ Available in two different styles.
✔ Easy customization of colors, width, height.
✔ And its free :) See the screenshot of two different styles below.
Add Popular Posts Widget To Your Blogger Template
Note: You may have already installed other popular posts widget and if this is the case, you need to remove the CSS code of those previously installed popular widgets to your sidebar. Otherwise you will screw it all.
This popular posts widget has two styles so I am going to break them down one by one. However, the JavaScript code will be same for both designs so you need to install it once only.
Add JavaScript Code First
Do not worry about this JavaScript code because this widget works without JavaScript code too. But the thumbnails quality will be only 72x72 pixels without using it. So to replace the default thumbnail size with our own desired size, we need to use this little piece of JavaScript code.
Step 1) Login back to your blogger account > Select your blog > Template > Edit HTML
Step 2) Save a backup of your blog template code first, now click inside the template code box.
Step 3) Find out this ending
</body> tag and just before this, paste the JavaScript code given below<script src='http://ajax.googleapis.com/ajax/libs/jquery/1.7.1/jquery.min.js' type='text/javascript'/>
<script type='text/javascript'>//<![CDATA[
$(document).ready(function() {
var tbn = 150;
$('#PopularPosts1').find('img').each(function(n, image){
var image = $(image);
image.attr({src : image.attr('src').replace(/s\B\d{2,4}/,'s' + tbn)});
image.attr('width',tbn);
image.attr('height',tbn);
});
});
//]]></script>
Customizing Thumbnail size: If you need bigger thumbnail size, just change the value highlighted in yellow color which is 150. It means our thumbnail size will be 150x150 pixels. Now we are done with JavaScript code so lets move on to adding CSS style one by one. Choose one you liked either Demo 1 or Demo 2.
Step 4) Find this little piece of code
]]></b:skin> and just before this code line, paste the CSS code given below (Choose one only ie. Demo 1 CSS code or Demo 2)Popular Posts Widget Demo 2 Style CSS Code
 /***** Sidebar Popular Posts - Style 2 By https://www.twistblogg.com *****/
    .sidebar .popular-posts ul {
      counter-reset: popcount;
      margin: 0;
      padding: 0;
      }
    .sidebar .popular-posts ul li:first-child {}
    .sidebar .popular-posts ul li {
      font-family:'Oswald','Open Sans','Helvetica Neue',Arial,Tahoma,sans-serif;
      height: 130px;
      list-style: none !important;
      overflow: hidden;
      padding: 0 !important;
      position: relative;
      margin: 2px;
      border: 0;
      width: 48%;
      float: left;
      }
    .sidebar .PopularPosts .item-thumbnail {margin: 0; width: 100%;}
    .sidebar .PopularPosts ul li img {
      display: block;
      float: left;
      padding: 0;
      width: 100%;
      height: 130px;
      -webkit-transition-duration: 1.0s; /*Webkit: Animation duration*/
      -moz-transition-duration: 1.0s; /*Mozilla Animation duration*/
      -o-transition-duration: 1.0s; /*Opera Animation duration*/
      transition:1.0s;
      }
    .sidebar .PopularPosts ul li img:hover {
      -webkit-transform:scale(1.06); /*Webkit: 0.5 times the original Image size*/
      -moz-transform:scale(1.06); /*Mozilla 0.5 times the original Image size*/
      -o-transform:scale(1.06); /*Opera 0.5 times the original Image size*/
      transform:scale(1.06);
      overflow: hidden;
      }
    .sidebar .PopularPosts .item-title {
      bottom:0;
      left: 0;
      right: 0;
      padding-bottom: 0;
      position: absolute;
      z-index: 999;
     }
    .sidebar .PopularPosts .item-title a {
      background: rgba(32, 32, 32, 0.77);
      color: #FFFFFF;
      display: block;
      font-size: 12px;
      line-height: normal;
      padding: 5px 0px 2px 5px;
      text-transform: capitalize;
      transition: all .4s ease-in-out;
      }
    .sidebar .popular-posts ul li:hover .item-title a {
      color: rgba(255, 255, 255, 1);
      background: rgba(231, 76, 60, 0.88);
      text-decoration: none;
      }
    .sidebar .popular-posts ul li:before {
      background: rgba(255, 252, 8, 1);
      color: #000;
      content: counter(popcount, decimal);
      counter-increment: popcount;
      float: left;
      font-size: 14px;
      line-height: 20px;
      list-style-type: none;
      padding: 0px 8px 1px 1px;
      border-radius: 0px 0px 10px 0px;
      position: absolute;
      top: 0;
      z-index: 4;
      border: solid #FFF;
      border-width: 0px 2px 2px 0px;
      }
Popular Posts Widget Demo 1 Style CSS Code
/***** Sidebar Popular Posts Style 1 By https://www.twistblogg.com *****/
    .sidebar .popular-posts ul {
      counter-reset: popcount;
      margin: 0;
      padding: 0;
      }
    .sidebar .popular-posts ul li:first-child {}
    .sidebar .popular-posts ul li {
      font-family: "Oswald",sans-serif;
      height: 130px;
      font-weight: bold;
      list-style: none !important;
      overflow: hidden;
      padding: 0px !important;
      position: relative;
      margin: 2px;
      border: 0;
      width: 100%;
      float: left;
    }
    .sidebar .PopularPosts .item-thumbnail {margin: 0; width: 100%;}
    .sidebar .PopularPosts ul li img {
      display: block;
      float: left;
      padding: 0;
      width: 100%;
      height: 130px;
      -webkit-transition-duration: 1.0s; /*Webkit: Animation duration*/
      -moz-transition-duration: 1.0s; /*Mozilla Animation duration*/
      -o-transition-duration: 1.0s; /*Opera Animation duration*/
      transition:1.0s;
      }
    .sidebar .PopularPosts ul li img:hover {
      -webkit-transform:scale(1.06); /*Webkit: 0.5 times the original Image size*/
      -moz-transform:scale(1.06); /*Mozilla 0.5 times the original Image size*/
      -o-transform:scale(1.06); /*Opera 0.5 times the original Image size*/
      transform:scale(1.06);
      overflow: hidden;
      }
    .sidebar .PopularPosts .item-title {
      bottom:0;
      left: 0;
      right: 0;
      padding-bottom: 0;
      position: absolute;
      z-index: 999;
     }
    .sidebar .PopularPosts .item-title a {
      background: rgba(32, 32, 32, 0.77);
      color: #FFFFFF;
      display: block;
      font-size: 16px;
      font-weight: bold;
      line-height: normal;
      font-family: "Oswald",sans-serif;
      padding: 10px 0px 5px 10px;
      text-transform: capitalize;
      transition: all .4s ease-in-out;
    }
    .sidebar .popular-posts ul li:hover .item-title a {
      color: rgba(255, 255, 255, 1);
      background: rgba(231, 76, 60, 0.88);
      text-decoration: none;
      }
    .sidebar .popular-posts ul li:before {
      background: rgba(255, 252, 8, 1);
      color: #000;
      content: counter(popcount, decimal);
      counter-increment: popcount;
      float: left;
      font-size: 14px;
      line-height: 20px;
      list-style-type: none;
      padding: 0px 8px 1px 1px;
      border-radius: 0px 0px 10px 0px;
      position: absolute;
      top: 0;
      z-index: 4;
      border: solid #FFF;
      border-width: 0px 2px 2px 0px;
      }
Now save your template code and see if your popular posts widget with thumbnails is working or not. It must be working.
Recommended: Floating Social Media Share Buttons For Blogger
Change Settings of You Popular Posts Widget Form Layout Area
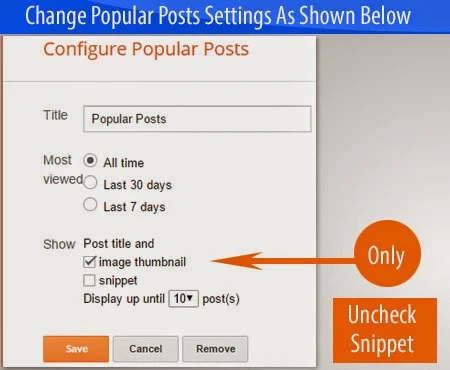
Now when everything is done, only one major step is remaining which is changing the settings of your popular posts widget because without changing these settings, it will definitely not work the way it is supposed to be working. Follow the settings as show exactly in the image below and save these settings.
Troubleshooting Popular Posts Widget On Sidebar is Not Working
There may be the case that after following all the steps accordingly, your popular posts widget did not work and is showing in its default settings. This is because of the use of different CSS class for sidebar on your template.
In our case above, I used
.sidebar because this the class I have used in my template for sidebar wrapper. Your template may be using different so you just need to figure it out and just change the .sidebar class appearance in the above CSS code with your blogs sidebar CSS class or id.
For Example: .sidebar .PopularPosts { will be .sidebar-wrapper .PopularPosts { or #sidebar .PopularPosts {
I hope you got the idea and you will find it out or else just share your blog URL in the comment box and I'll check it manually. Stay blessed.
