What is a Sitemap?
Sitemap is a map of a site that includes all published posts in a single page. In other words, it is a navigation page that helps visitors to navigate via all articles. Sitemap categorizes the posts based on the label. Same label articles are listed together. Sitemap is important for SEO. Yes,you heard it right. It helps to showcase your posts to visitors and reduces the bounce rate,which in turn boosts traffic.One bad news: Blogger doesn't have in-built sitemap page. Hence for a blogspot blogger, it is a must to externally add a stylish and pro-looking sitemap to blogspot.
Features of this Stylish Sitemap Page
- Eye Catching Looks.
- All Labels are separated neatly.
- Easy for users to navigate via the posts.
- Numbered System is added.
- New labels are added automatically.
- Labels are categorized alphabetically.
- Professional and Stylish color combination used.
Recommended : Add Stylish Contact Page For Blogger Blog
How to add stylish sitemap to blogspot?
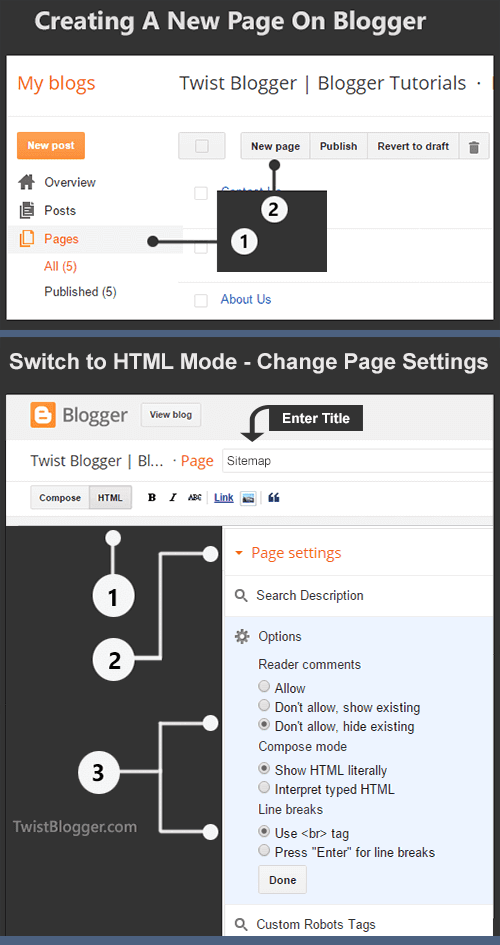
Step 1: Create a New Page On Your Blog
First of all, create a new page and Enter the Title as Sitemap. Click on Page Settings,modify the page settings as shown below and switch to HTML Mode.Note: Once the title is given, a permalink will be automatically generated. So give the title as soon as you create a new page.

Step 2: Copy and Paste The Whole Code
Once you've switched to HTML Mode, you can see few lines of HTML coding in post editor by default. Select those lines,remove them and paste the below CSS and javascript code . For further customization of the code,see the Editing section.<!-- Sitemap page for blogger by TwistBlogg.Com -->
<style type="text/css">
#twistblogg{
width:99%;
margin:5px auto;
border:1px solid #05a0ff;
-webkit-box-shadow:4px 4px 8px 2px rgba(0,0,0, 0.2);
-moz-box-shadow:4px 4px 8px 2px rgba(0,0,0, 0.2);
box-shadow:4px 4px 8px 2px rgba(0,0,0, 0.2);
}
.labl{
color:#FF5F00;
font-weight:bold;
margin:0 -5px;
padding:1px 0 2px 11px;
background:-moz-linear-gradient(right,#c2eafe 0%,#05a0ff 40%);
background:-webkit-gradient(linear,left 10,right 80,color-stop(0.20,#05a0ff),color-stop(1,#c2eafe));
border:1px solid #37c2dd;
border-radius:4px;-moz-border-radius:4px;
-webkit-border-radius:4px;box-shadow:3px 3px 1px #a0a0a0;
-moz-box-shadow:3px 3px 1px #a0a0a0;-webkit-box-shadow:3px 3px 1px #a0a0a0;display:block;
}
.labl a{color:#fff;
}
.labl:first-letter{text-transform:uppercase;
}
.new{color:#FF5F00;
font-weight:bold;
font-style:italic;
}
.postname{font-weight:normal;
background:-moz-linear-gradient(right,#C2EAFE 0%,#fff 40%);
background:-webkit-gradient(linear,left 80,right 10,color-stop(0.50,#fff),color-stop(1,#C2EAFE));
}
.postname li{border-bottom: #ddd 1px dotted;
margin-right:5px
}
/*This is optional - For full width Sitemap*/
.sidebar, #bottom, #blog-pager, h2.post-title, .comments {
display: none !important;
}
#content { width: 100% !Important; }
@media only screen and (max-width: 1089px) and (min-width: 980px) { #content { width: 100% !Important; } } @media only screen and (max-width: 979px) and (min-width: 768px) { #content { width: 100% !Important; } } @media only screen and (max-width: 767px) and (min-width: 480px) { #content { width: 100% !Important; } } @media only screen and (max-width: 479px) { #content { width: 100% !Important; } }
</style>
<div id="twistblogg">
<script src="https://amanbhattarai4400.github.io/csshosting/sitemap.js" type="text/javascript"></script>
<script src="https://twistblogg.blogspot.com/feeds/posts/default?max-results=9999&alt=json-in-script&callback=loadtoc">
</script></div>
Note: I didn't write the whole code. I got the reference code from Internet and I played with CSS to modify it. I don't know who is the creator of the reference code. If you are the one, please let me know, I'll give proper credits.
Recommended: Add an Elegant HTML Sitemap Page to Blogger Blog
Editing Section:
➜ Change
https://twistblogg.blogspot.com with your site url.➜/*This is optional - For full width Sitemap*/ Part is for making the sitemap full width. You may need to modify the
.sidebar, #bottom, #blog-pager, h2.post-title, .comments according to the tags given in your blogger template. If you need help to figure that out, let me know below.➜I've hosted the javascript coding on github.["
https://amanbhattarai4400.github.io/csshosting/sitemap.js"] You can host it by yourself. Check this article on how to host CSS,JS and HTML in GitHubBonus Tip: I personally love to link Sitemap on 404 Error Pages or simply redirect error pages to sitemap page.
![Add Stylish Sitemap Page To Blogger [Pro Version]](https://blogger.googleusercontent.com/img/b/R29vZ2xl/AVvXsEh_COVWKTFILSuaKOoYCXqW-FXxezFOkS-RJQe7IJYulJTseqBL3EI7C4ld3SJy94H3CiH3u4EPa_qk7jx-BCgczXih9iG388ZDHvN2bGJMx0xp1Ut8__mwGA6BTExjt0TWMSTUrzPlxn8B/s16000/Add+stylish+Sitemap+page+to+blogger+blog.png)